Voice Memos is a built-in digital voice recorder in the iPhone. Why would you need a recorder? Consider all the times you'd find it useful to have a voice recorder in your pocket — perhaps when you're attending a lecture or conducting an interview. Or maybe you just want to leave yourself a quickie reminder about something. Sometimes, there are many important, interesting or useful voice files storing on our iPhone which you don't want to lost. To keep these iPhone voice files which create by Voice Memo secure, one of the best way is transfering them from iPhone to computer.
Situations to transfer your iPhone Voice Memo to PC:
- There are too many Voice Memo storing on your iPhone, you want to free up your iPone space
- Something wrong with your iPhone, you have to restore your iPhone to factory settings
- Buy a new iPhone or other phone and want to resell the old iPhone, or need to send your iPhone back to Apple store/factory, so you need to wipe all data on iPhone
- Backup iPhone data before iOS upgrade, iOS downgrade, iOS jailbreak
- Wanting to share the Voice Memo to someone
- And so on
3 Ways to Transfer Voice Memos from iphone to Computer
Methods 1. Transfer iPhone Voice Memos Via Email/MMS
1. Launch the Voice Memos app on your iPhone.
2. Choose the memo you want to send.


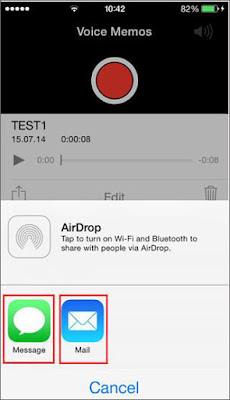
3. Tap on Share button as the below picture.
4. Now you can choose whether to send your memo via email or message. Just follow the instructions on the screen.


1. Launch iTunes and connect your iPhone to computer via its USB cable.
2. Choose your iPhone in the main menu.
3. Open Music bookmark and tick a box next to Include Voice Memos setting.
4. Synchronise the music by pressing Apply button.
5. Your memos will appear in the Music list! (you can access the actual audio file simply by right-clicking on the memo).
Method 3. Transfer iPhone Voice Memo to PC via iPhone Data Manager
iPhone Data Manager is an ideal Apple devices manager lets you to transfer iDevices'songs, videos, audios, playlists, iTunes U, Podcasts to iTunes/PC, and vice verse. So with the help of this transfer program, you can easily transfer your voice memo from iPhone to PC. You can click the below buttons to get a trial version and follow the steps to transfer your memo with a click.
Step 1. Download and install iPhone Data Manager
Step 2. Connect iPhone with your computer via a USB cable
Step 3. Transfer iPhone voice memo to PC
In the primary windows, click Voice memos in the left column to reveal all voice memos. Check the voice memos that you want to transfer from iPhone to PC and click "Export".
Supported Apple Devices
iPhone iPhone 6S, iPhone 6, iPhone 6 Plus, iPhone 5s, iPhone 5c, iPhone 5, iPhone 4S, iPhone 4, iPhone 3GS
iPad iPad air, iPad mini with Retina display, iPad mini, iPad with Retina display, The New iPad, iPad 2, iPad
iPod iPod touch 5, iPod touch 4, iPod touch 3, iPod classic 3, iPod classic 2, iPod classic, iPod shuffle 4, iPod shuffle 3, iPod shuffle 2, iPod shuffle 1, iPod nano 7, iPod nano 6, iPod nano 5, iPod nano 4, iPod nano 3, iPod nano 2, iPod nano
Supported iOS
iOS iOS 5, iOS 6, iOS 7 & iOS 8
Related Tutorial: How to Restore Deleted iPhone Voice Memo


Good blog thanks for sharing this informative article.
ReplyDeleteOracle Fusion HCM Online Training
Oracle Fusion SCM Online Training
Oracle Fusion Financials Online Training
Big Data and Hadoop Training In Hyderabad
Excellent blog I visit this blog it's really awesome. The important thing is that in this blog content written clearly and understandable. The content of information is very informative.
ReplyDeleteOracle Fusion HCM Online Training
Such a nice blog, I really like this blog,because of you have written a valuable information in This blog.
ReplyDeleteOracle Fusion Financials Online Training